Als Client003 verwende ich mein HP EliteBook 8560p. Am Ende des Windows Deployments soll das Notebook mit BitLocker verschlüsselt sein. Als Grundlage für die Einstellungen verwende ich den Microsoft Technet-Artikel Best Practices for BitLocker in Windows 7. Die größte Herausforderung dabei ist die Aktivierung des TPM-Chips im BIOS ohne Benutzereingaben.
BitLocker mit MDT aktivieren – Schritte:
- HP Software herunterladen und konfigurieren
- Active Directory zum Speichern der TPM Ownership-Informationen vorbereiten
- BitLocker Drive Encryption-Features installieren
- Gruppenrichtlinien für BitLocker konfigurieren
- Anwendungen in MDT zur OSD Prod Share hinzufügen
- Task Sequence konfigurieren
- CustomSettings.ini anpassen
- Notebook mit BitLocker aufsetzen
HP Software herunterladen und konfigurieren
- Als Administrator an Client003 anmelden
- HPQPswd Anwendung (sp61312.exe) von ftp://ftp.hp.com/pub/softpaq/sp61001-61500/sp61312.exe nach C:\Sourcen herunterladen und mit 7-Zip entpacken
- BIOS Configuration Utility (sp65619.exe) von http://ftp.hp.com/pub/softpaq/sp65501-66000/sp65619.exe nach C:\Sourcen herunterladen und mit 7-Zip entpacken
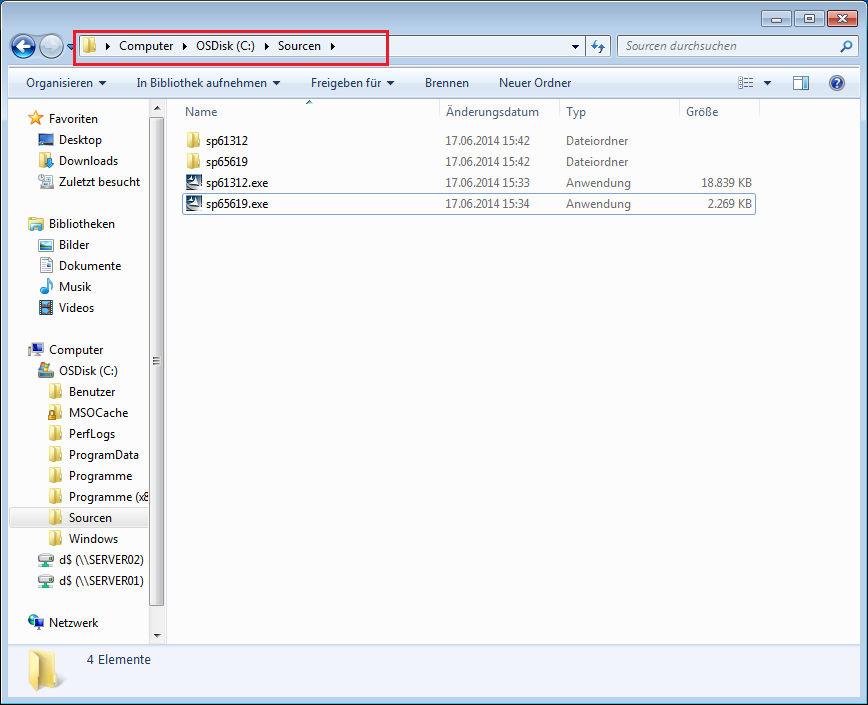
- In den Ordner C:\Sourcen\sp65619 wechseln
- Setup.exe doppelklicken
- Install Shield Wizard
- Next
- Install
- Finish
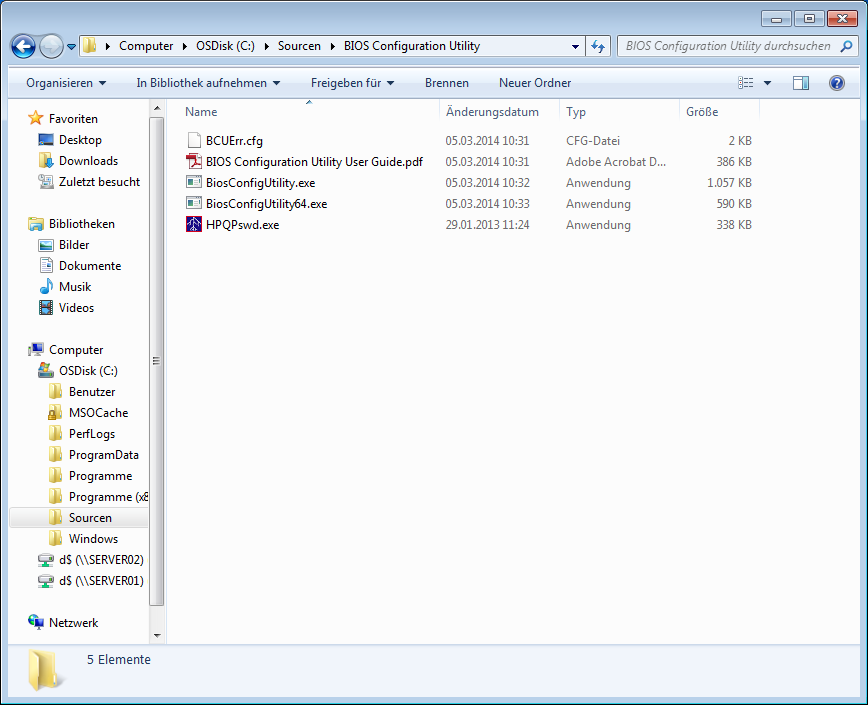
- Den Ordner C:\Program Files (x86)\Hewlett-Packard\BIOS Configuration Utility nach C:\Sourcen kopieren
- Die Datei C:\Sourcen\sp61312\HPQPswd.exe nach C:\Sourcen\BIOS Configuration Utility kopieren
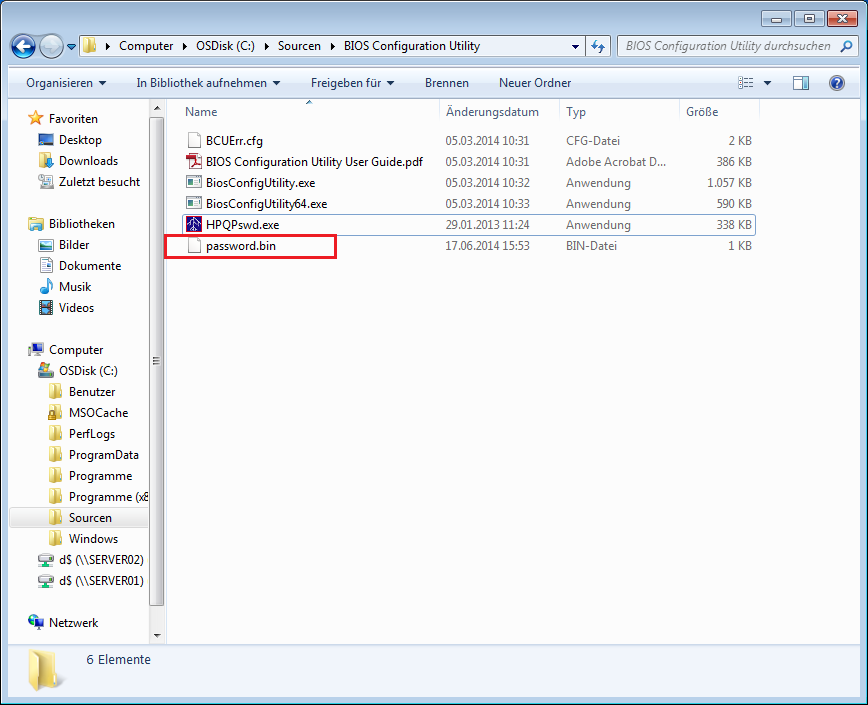
- HPQPswd.exe doppelklicken
- HPQPswd
- Password to be encrypted: Password1
- Re-enter password: Password1
- File to save encrypted password: password.bin > OK

- Eingabeaufforderung als Administrator starten
- Nach C:\Sourcen\BIOS Configuration Utility wechseln
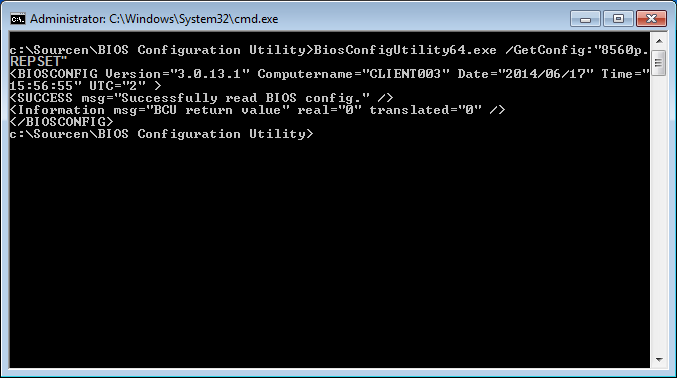
- Mit folgendem Befehl die aktuelle BIOS-Konfiguration in der Datei 8560p.REPSET speichern
BiosConfigUtility64.exe /GetConfig:"8560p.REPSET"
- Die Konfiguration wurde gespeichert
- Die Datei C:\Sourcen\BIOS Configuration Utility\8560p.REPSET mit dem Notepad öffnen und wie folgt ändern
English ; ; Settings file originally created by BIOS Config Utility ; Version:3.0.13.1 ; Date:2014.06.17 ; Reset of TPM from OS Disable *Enable OS Management of TPM Disable *Enable Activate Embedded Security On Next Boot Disable *Enable Embedded Security Device Availability *Available Hidden Embedded Security Activation Policy F1 to Boot Allow user to reject *No prompts - Datei speichern und schließen
- Den Ordner nach C:\Sourcen\HP BIOS Configuration Utility umbenennen und nach \\SERVER02\d$\Sourcen\Software\ kopieren
- Client003 herunterfahren und ausschalten
Active Directory zum Speichern der TPM Ownership-Informationen vorbereiten
- Als Administrator an SERVER01 anmelden
- Add-TPMSelfWriteACE.vbs von http://technet.microsoft.com/en-us/library/dn466534.aspx nach C:\Sourcen herunterladen
- Command Promp (Admin) starten
- Nach C:\Sourcen wechseln
- Das Script mit folgendem Befehl ausführen
cscript.exe Add-TPMSelfWriteACE.vbs
- Das Script wurde erfolgreich ausgeführt
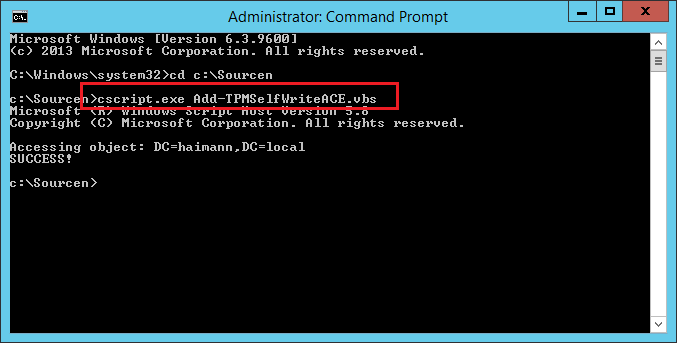
- Command Promp schließen
- Administrator von SERVER01 abmelden
BitLocker Drive Encryption-Features installieren
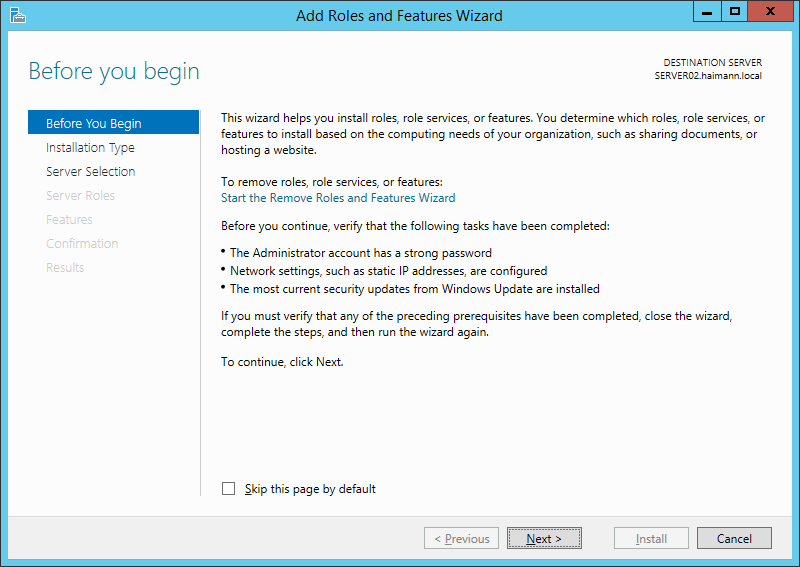
- Als Administartor an SERVER02 anmelden
- Server Manager > Local Server > Manage > Add Roles and Features
- Add Roles and Features Wizard
- Before You Begin: Next
- Installation Type: Role-based or feature-based installation > Next
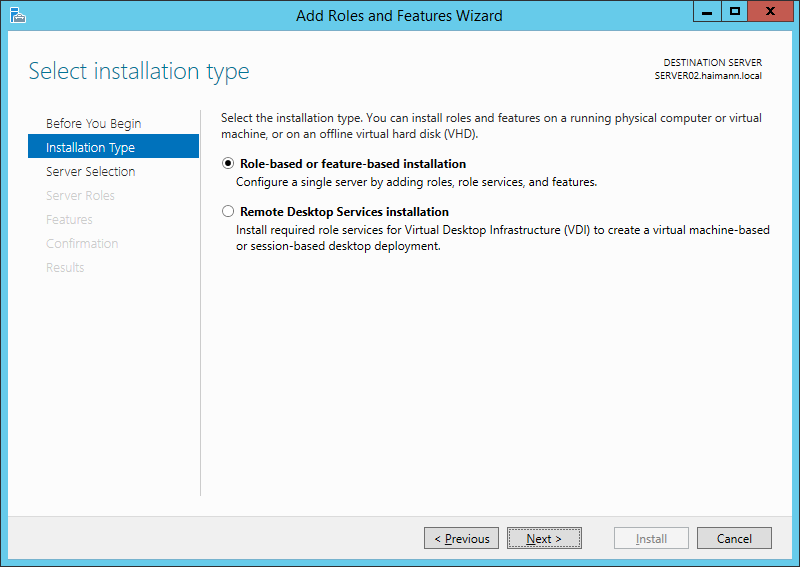
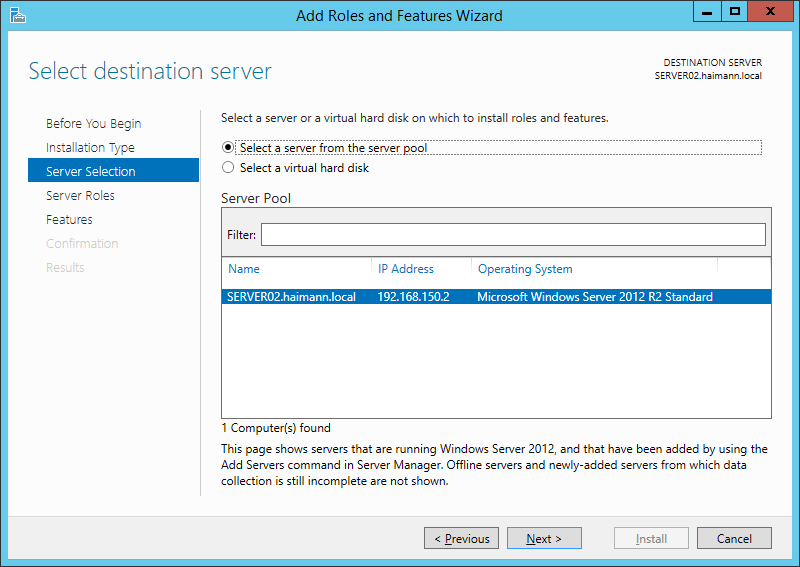
- Server Selection: SERVER02 > Next
- Server Roles: Next
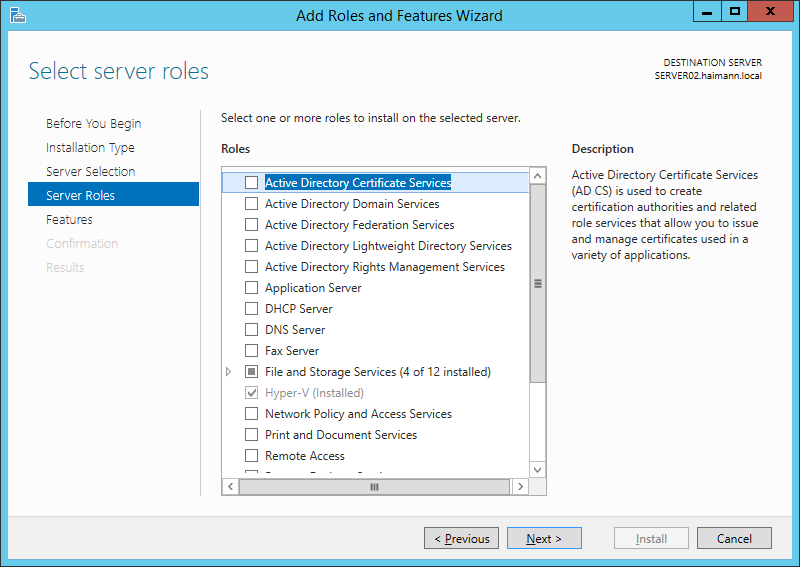
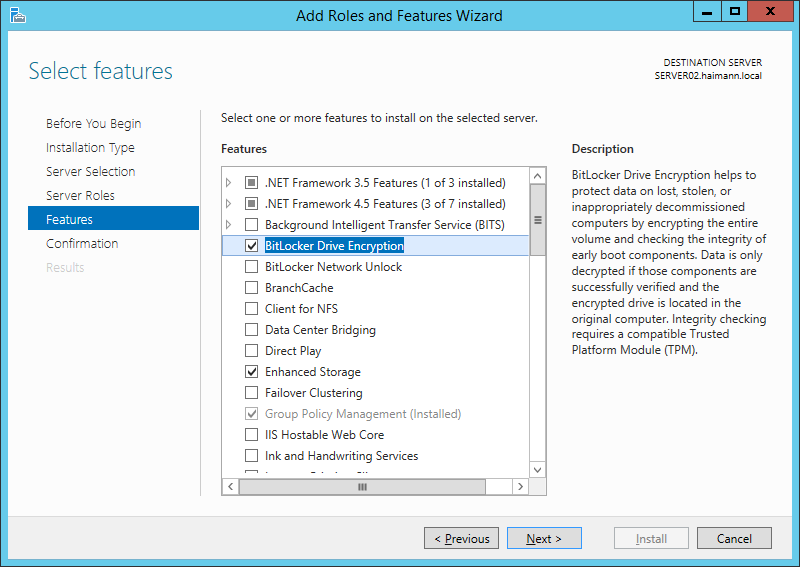
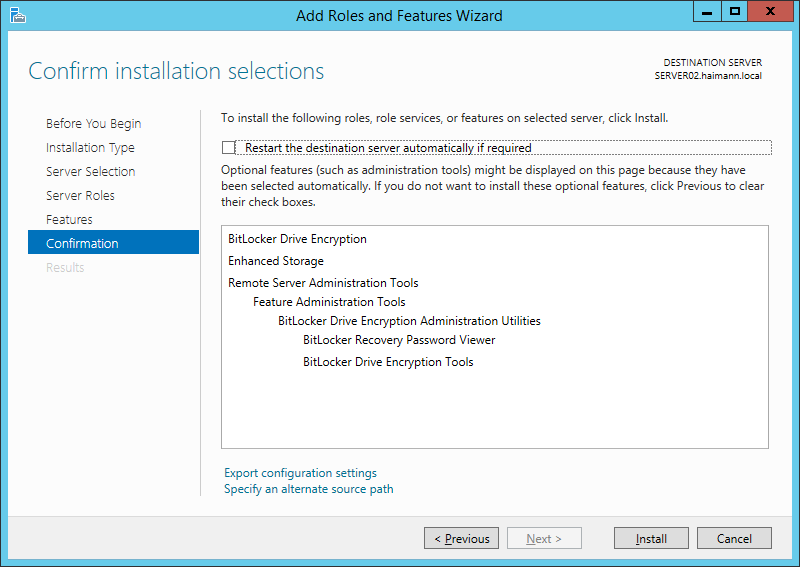
- Features: BitLocker Drive Encryption
- Add Roles and Features Wizard > Add Features > Next
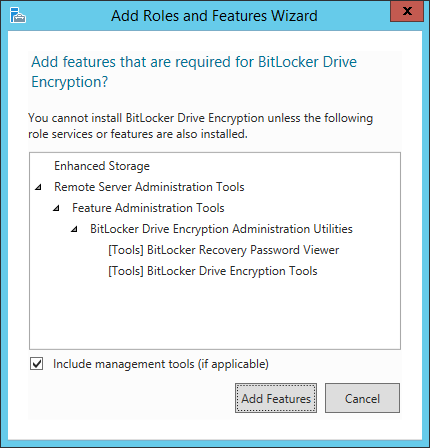
- Add Roles and Features Wizard > Add Features > Next
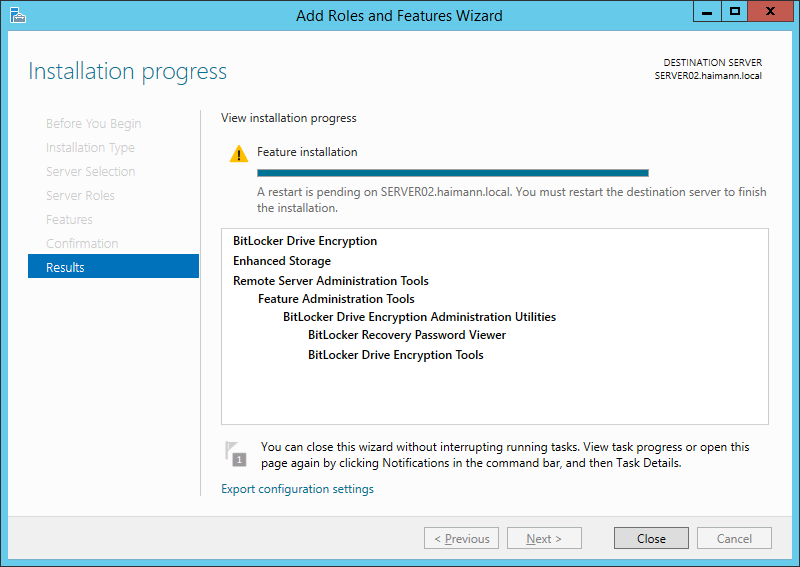
- Confirmation: Install
- Results: Close
- Before You Begin: Next
- SERVER02 neu starten
Gruppenrichtlinien für BitLocker konfigurieren
- Als Administrator an SERVER02 anmelden
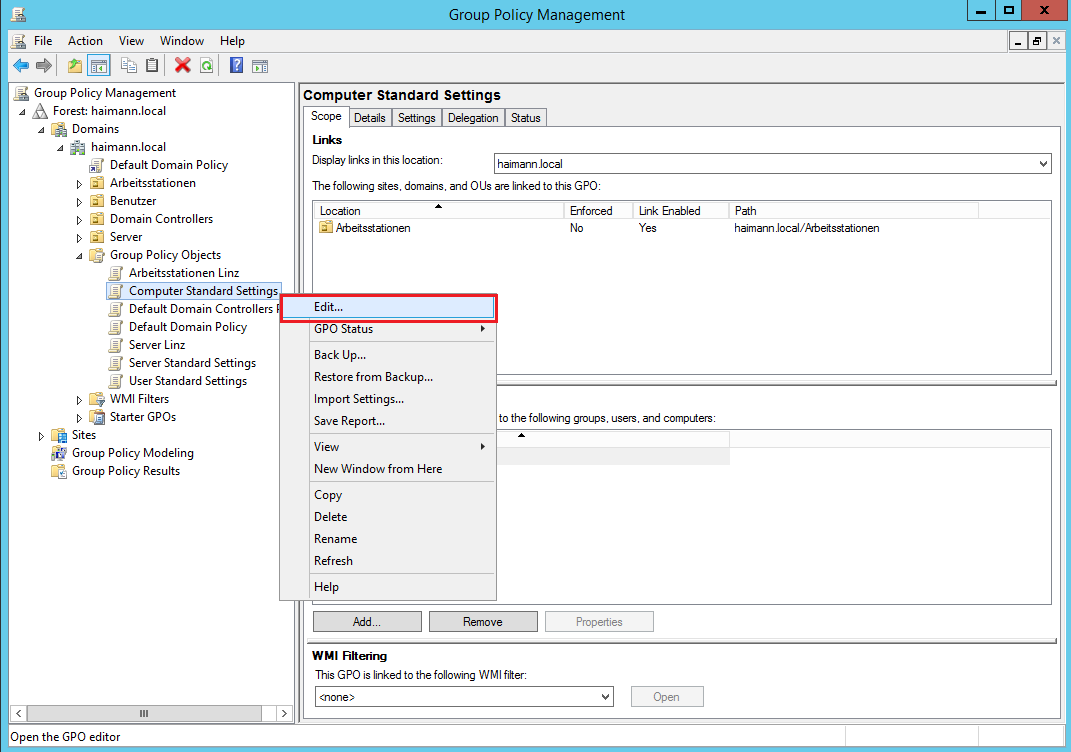
- Server Manager > Local Server > Tools > Group Policy Management
- haimann.local\Group Policy Objects erweitern
- Computer Standard Settings rechts anklicken und im Kontextmenü Edit… anklicken
- Den Ordner Computer Configuration\Administrative Templates\Windows Components\BitLocker Drive Encryption erweitern
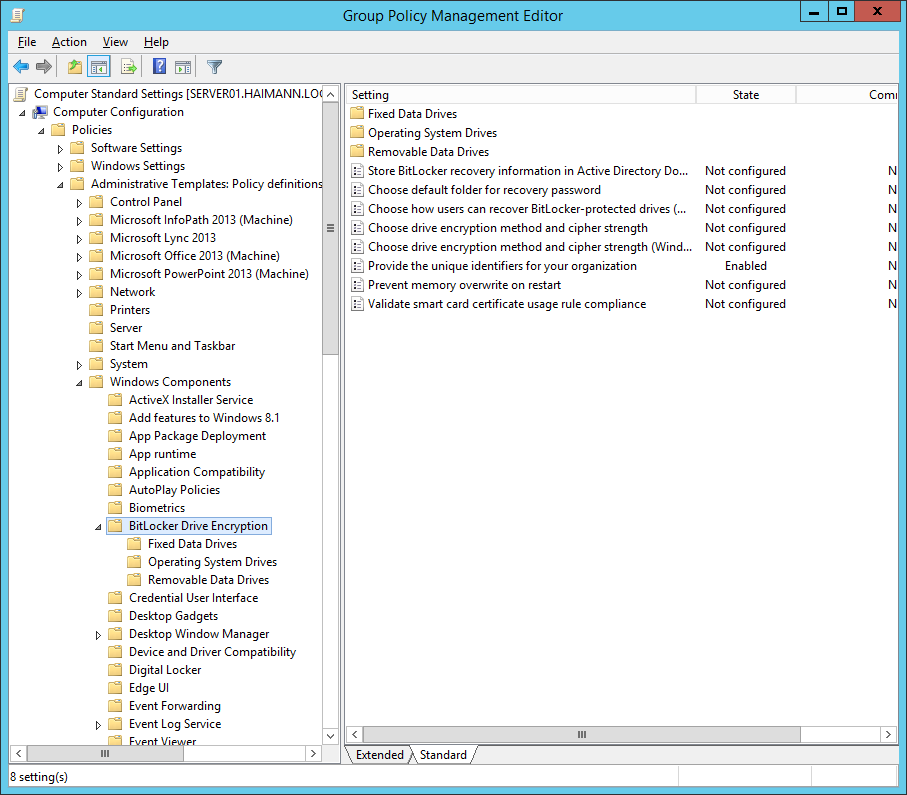
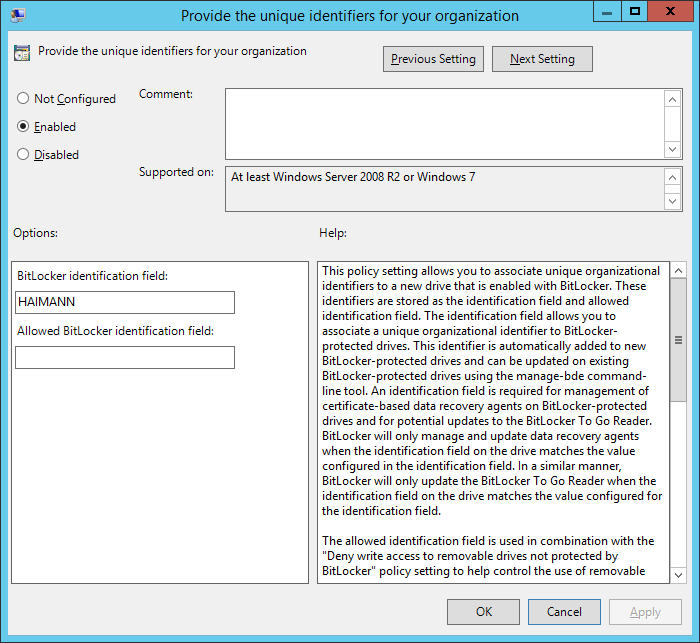
- In Teil 6h habe ich bereits die Einstellung Provide the unique identifiers for your organization konfiguriert, damit der BitLocker Data Recovery Agent funktioniert
- Den Ordner Computer Configuration\Administrative Templates\Windows Components\BitLocker Drive Encryption\Operating System Drives anklicken
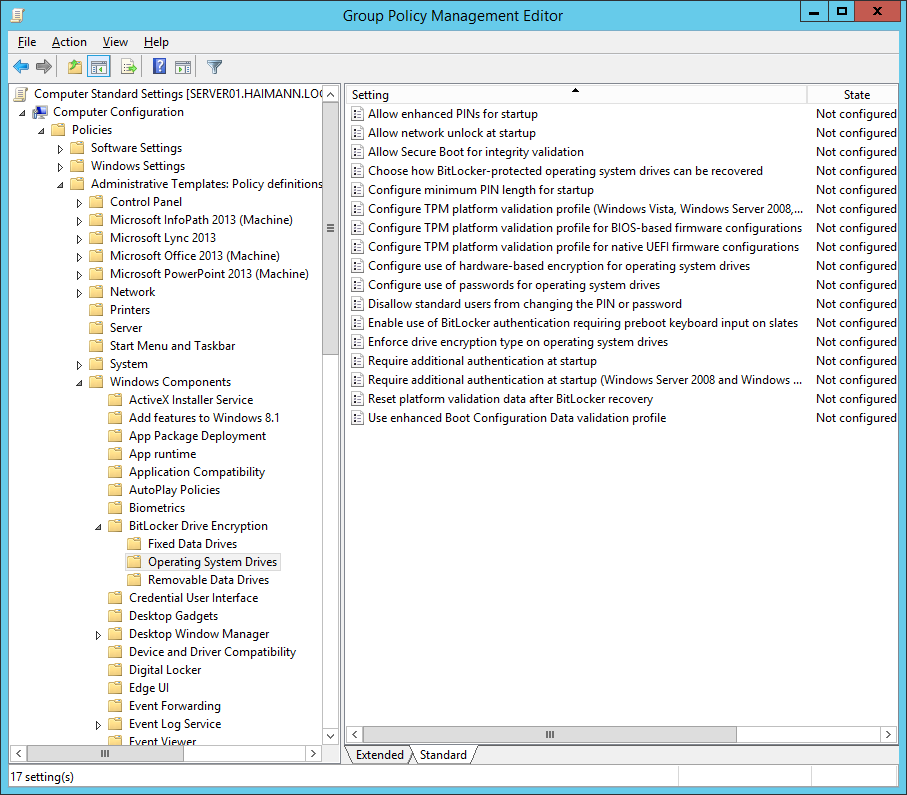
- Folgende Einstellungen vornehmen
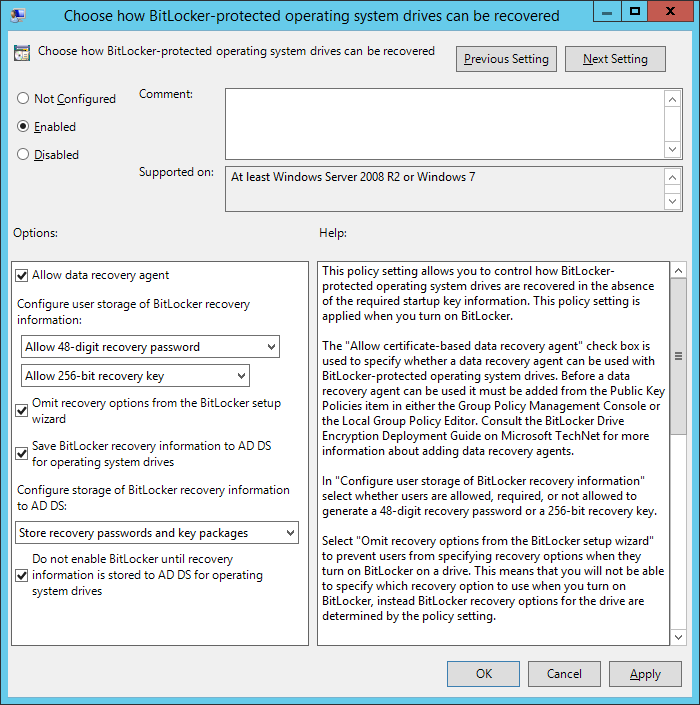
- Choose how BitLocker-protected operating system drives can be recovered
- Configure minimum PIN length for startup

- Configure TPM platform validation profile (Windows Vista, Windows Server 2008, Windows 7, Windows Server 2008 R2) (aktivieren und Standard übernehmen)

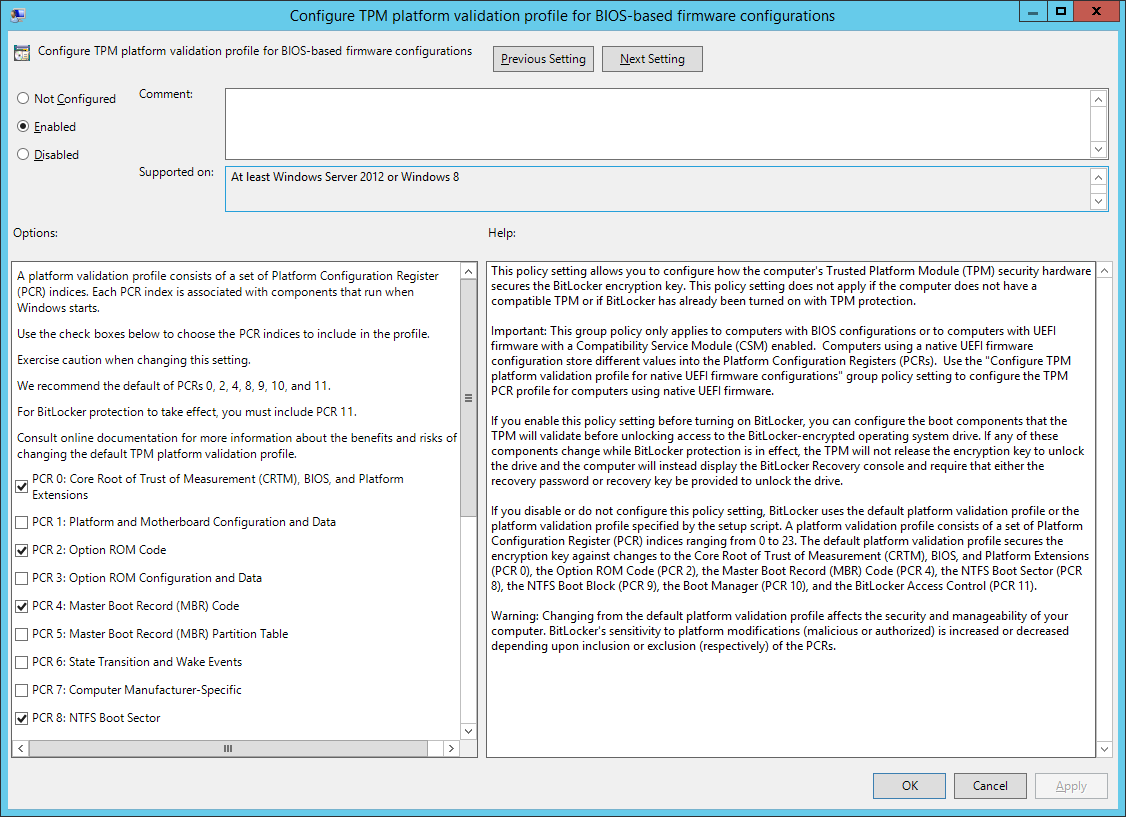
- Configure TPM platform validation profile for BIOS-based firmware configurations (aktivieren und Standard übernehmen)
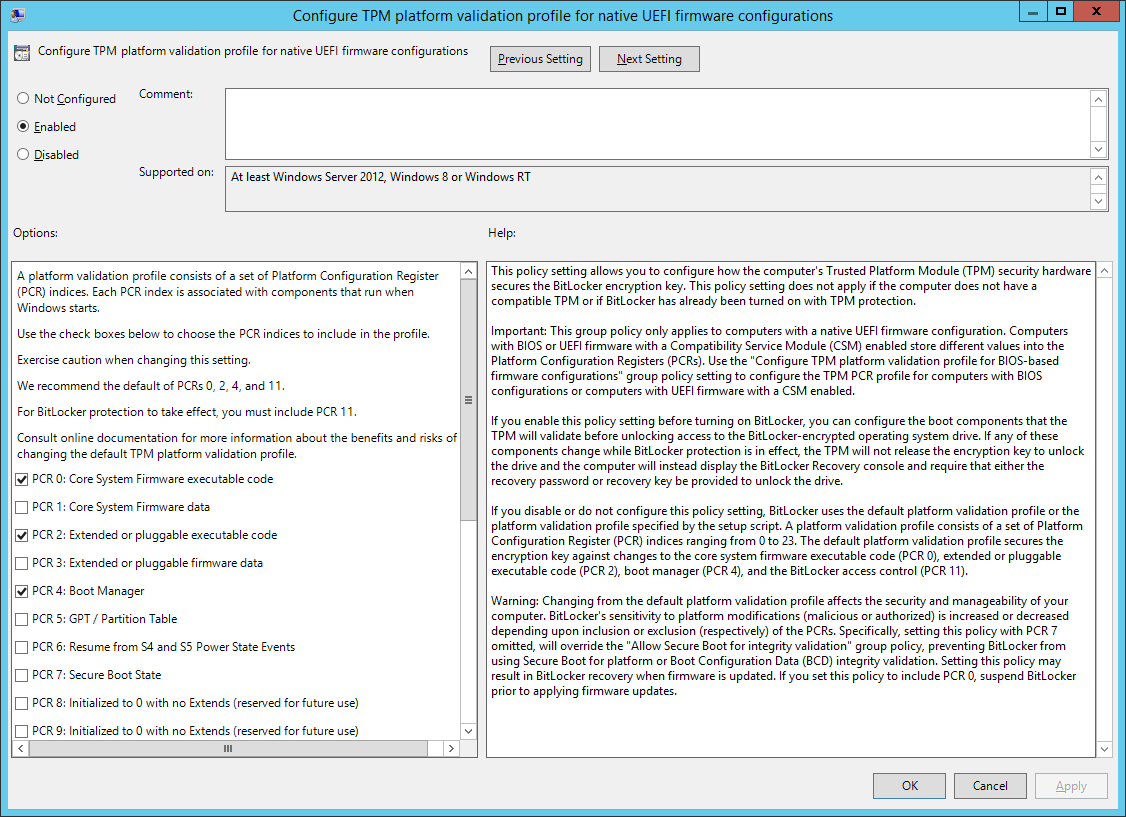
- Configure TPM platform validation profile for native UEFI firmware configurations (aktivieren und Standard übernehmen)
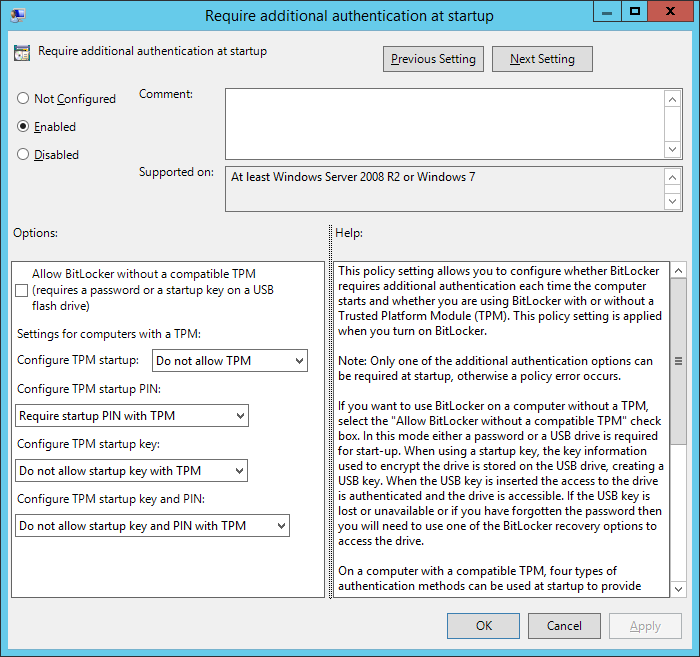
- Require additional authentication at startup
- Choose how BitLocker-protected operating system drives can be recovered
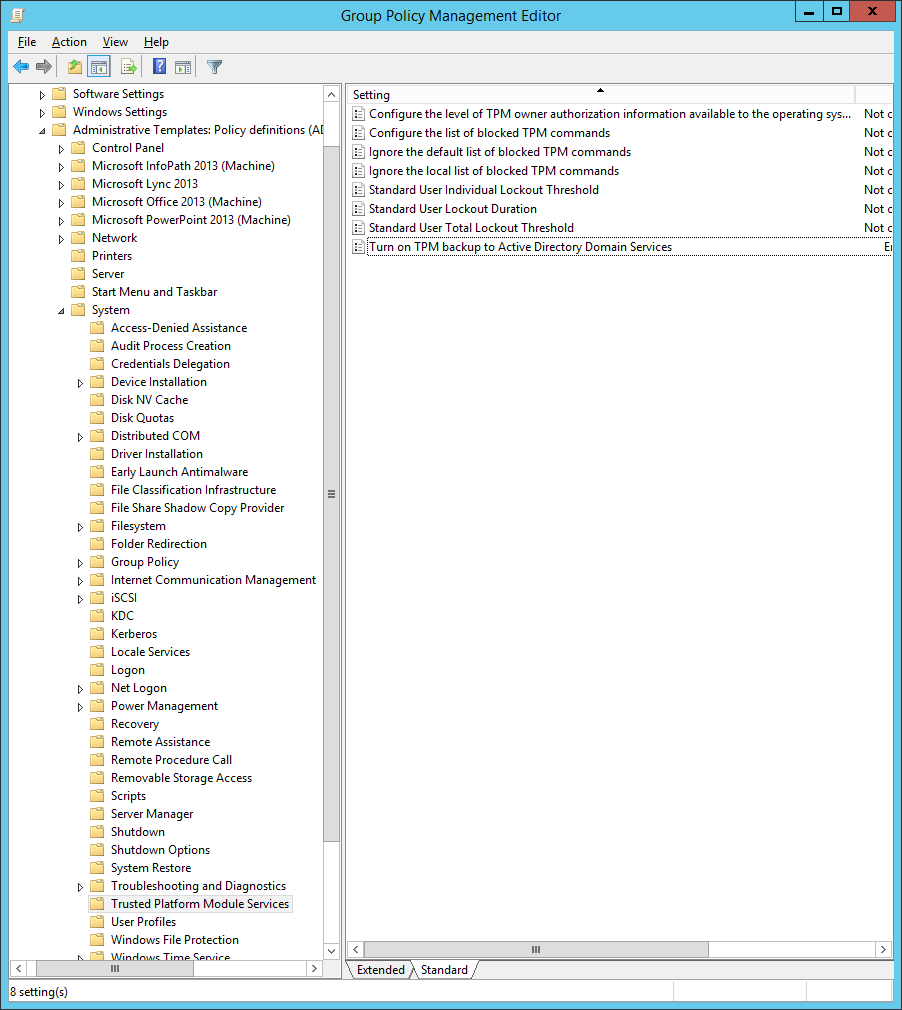
- Den Ordner Computer Configuration\Administrative Templates\Windows Components\System\Trusted Platform Module Services anklicken
- Folgende Einstellung vornehmen
- Turn on TPM backup to Active Directory Domain Services
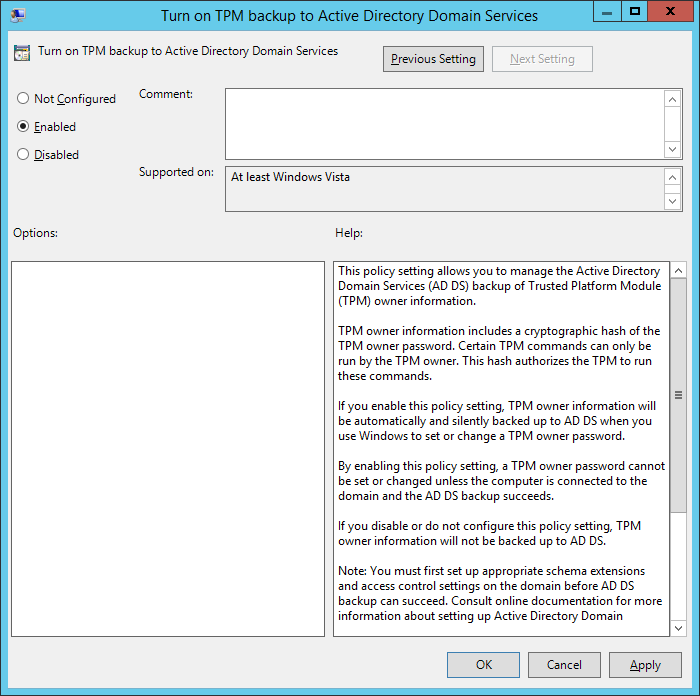
- Turn on TPM backup to Active Directory Domain Services
- Den Ordner Computer Configuration\Administrative Templates\System\Power Management\Sleep Settings anklicken
- Folgende Einstellungen vornehmen
- Allow Standby States (S1-S3) When Sleeping (on Battery)
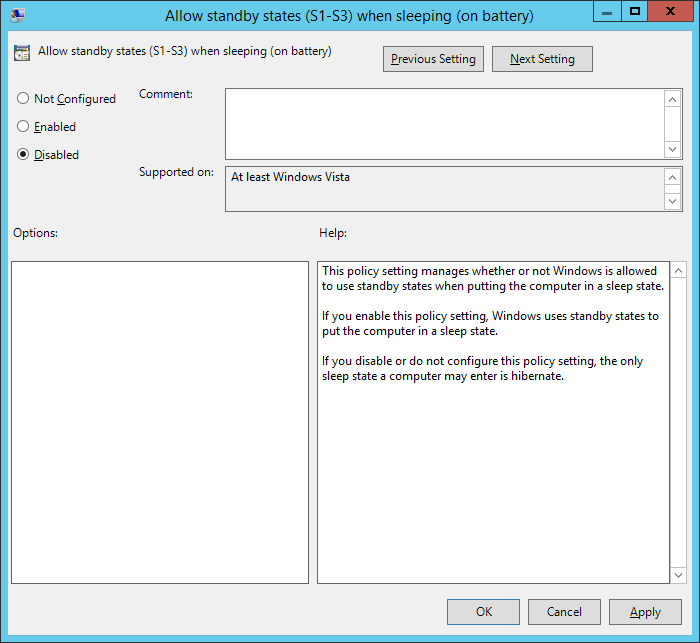
- Allow Standby States (S1-S3) When Sleeping (plugged in)

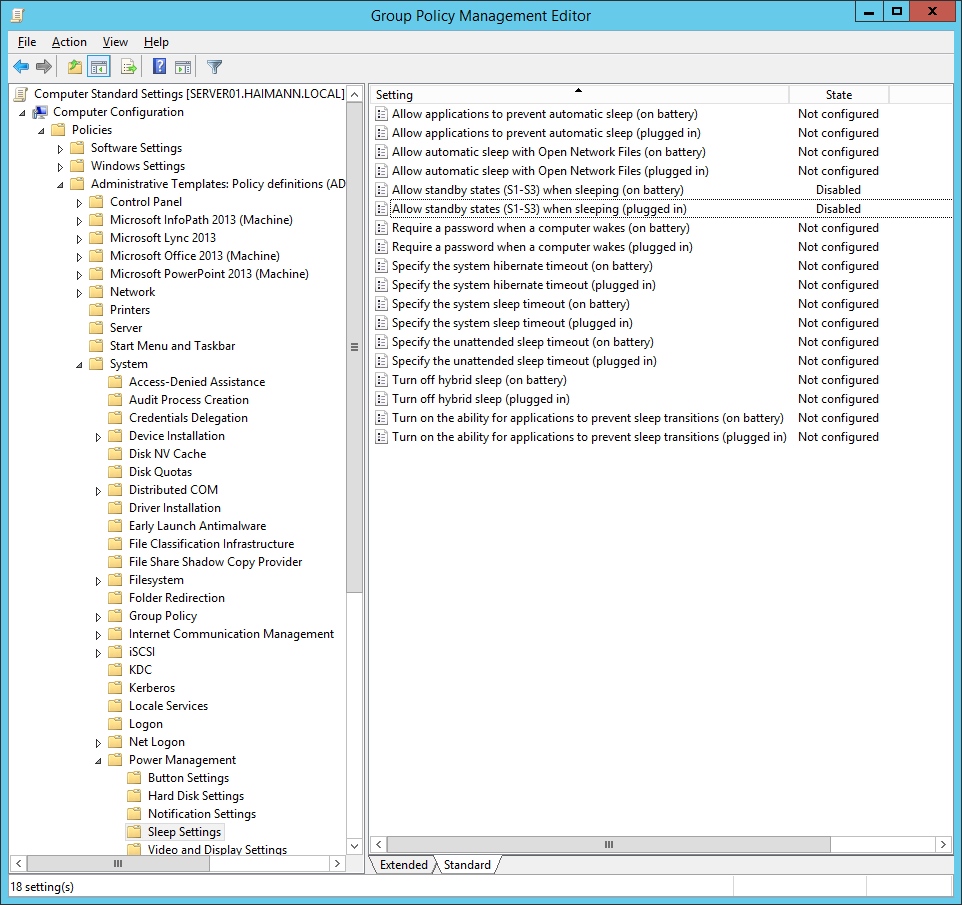
- Allow Standby States (S1-S3) When Sleeping (on Battery)
- Group Policy Management Editor schließen
- Group Policy Management-Konsole schließen
Anwendungen in MDT zur OSD Prod Share hinzufügen
- Deployment Workbench starten
- OSD Prod Share\Applications erweitern
- Den Ordner HP erstellen
- Folgende Anwendungen zum Ordner HP hinzufügen
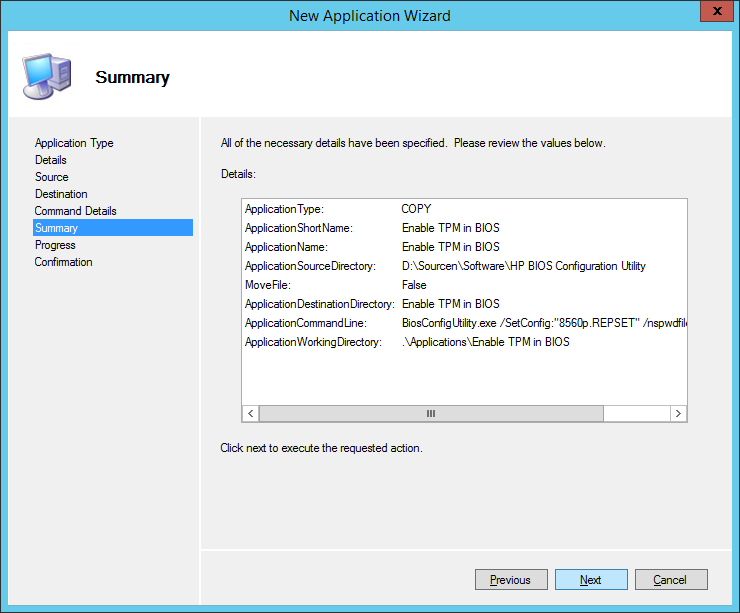
- Application name: Enable TPM in BIOS
- Source: D:\Sourcen\Software\HP BIOS Configuration Utility
- Command line:
BiosConfigUtility.exe /SetConfig:"8560p.REPSET" /nspwdfile:"password.bin"
- Summary
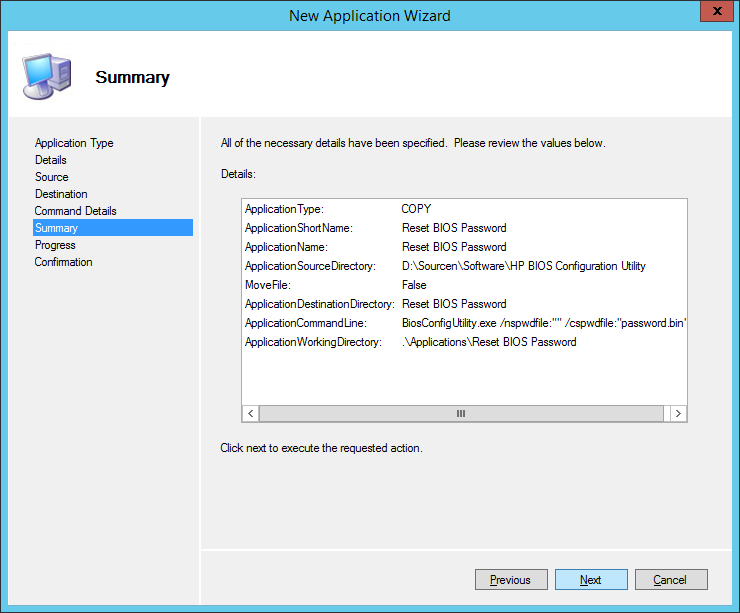
- Application name: Reset BIOS Password
- Source: D:\Sourcen\Software\HP BIOS Configuration Utility
- Command line:
BiosConfigUtility.exe /nspwdfile:"" /cspwdfile:"password.bin"
- Summary
- Anwendungen in MDT
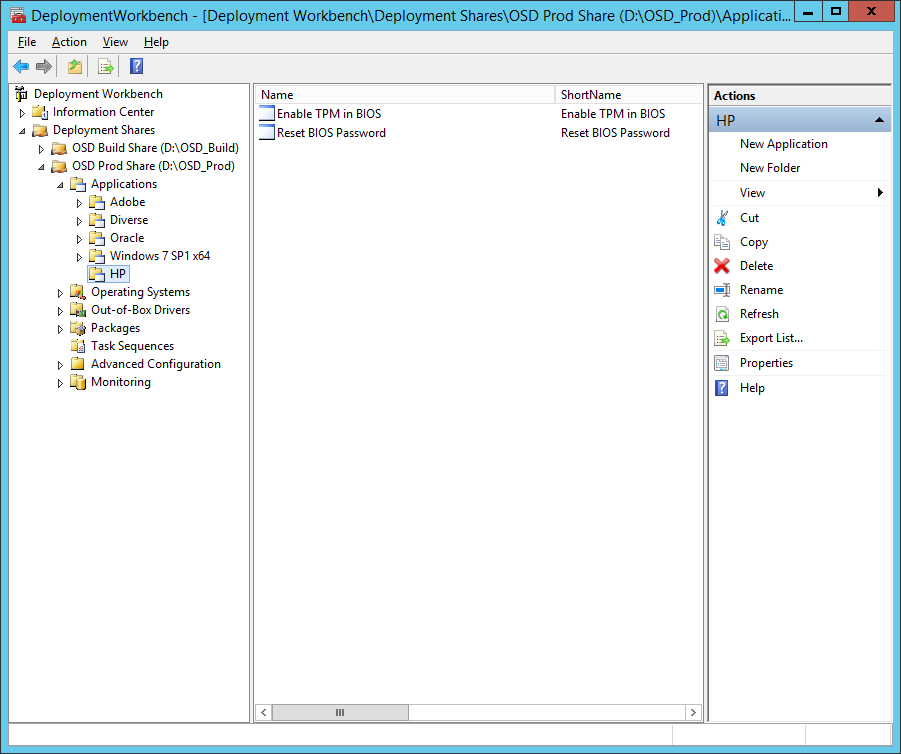
- Application name: Enable TPM in BIOS
Task Sequence konfigurieren
- Task Sequences anklicken
- Windows 8.1 U1 Ent x64 – Office 2013 rechts anklicken und im Kontextmenü Properties anklicken
- Auf den Reiter Task Sequence wechseln
- Die Phase State Restore erweitern
- Den Ordner Custom Tasks markieren
- Add > New Group
- Properties
- Name: Enable TPM in BIOS
- Options
- Add > If statement
- If Statement Properties
- none > OK
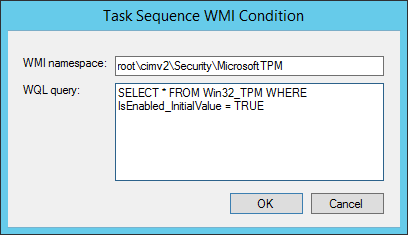
- Add > Query WMI
- WMI namespace: root\cimv2\Security\MicrosoftTPM
- WQL query:
SELECT * FROM Win32_TPM WHERE IsEnabled_InitialValue = TRUE
- OK
- Add > Task Sequence Variable
- Variable: BdeInstallSuppress
- Condition: equals
- Value: YES > OK > Apply
- Properties
- Add > General > Install Application
- Properties
- Name: Enable TPM in BIOS
- Install a single application: HP\Enable TPM in BIOS > OK > Apply
- Properties
- Add > General > Install Application
- Properties
- Name: Reset BIOS Password
- Install a single application: HP\Reset BIOS Password > OK > Apply
- Properties
- Add > General > Restart computer
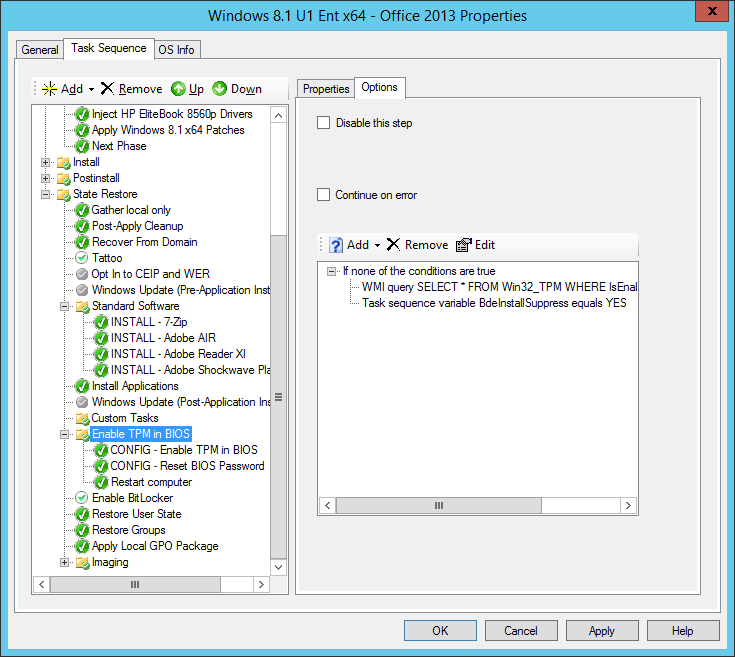
- Fenster mit OK schließen
CustomSettings.ini anpassen
- OSD Prod Share rechts anklicken und im Kontextmenü Properties anklicken
- Auf den Reiter Rules wechseln
- Den Bereich [Settings] wie folgt anpassen
[Settings] Priority=CSettings, CRoles, RApps, Akkubetrieb, DefaultGateway, <strong>ByLaptopType,</strong> Default Properties=MyCustomProperty [Akkubetrieb] Subsection=Akkubetrieb-%IsOnBattery% [Akkubetrieb-True] OSInstall=NO [DefaultGateway] 192.168.150.1=Linz 192.168.160.1=Salzburg [Linz] MachineObjectOU=OU=Linz,OU=Arbeitsstationen,DC=haimann,DC=local [Salzburg] MachineObjectOU=OU=Salzburg,OU=Arbeitsstationen,DC=haimann,DC=local <strong>[ByLaptopType] Subsection=Laptop-%IsLaptop% [Laptop-True] SkipBitLocker=NO BDEInstallSuppress=NO OSDBitLockerMode=TPMPin OSDBitLockerCreateRecoveryPassword=AD OSDBitLockerWaitForEncryption=FALSE </strong> ; MDT Standard Regeln [Default] OSInstall=Y - Fenster mit OK schließen
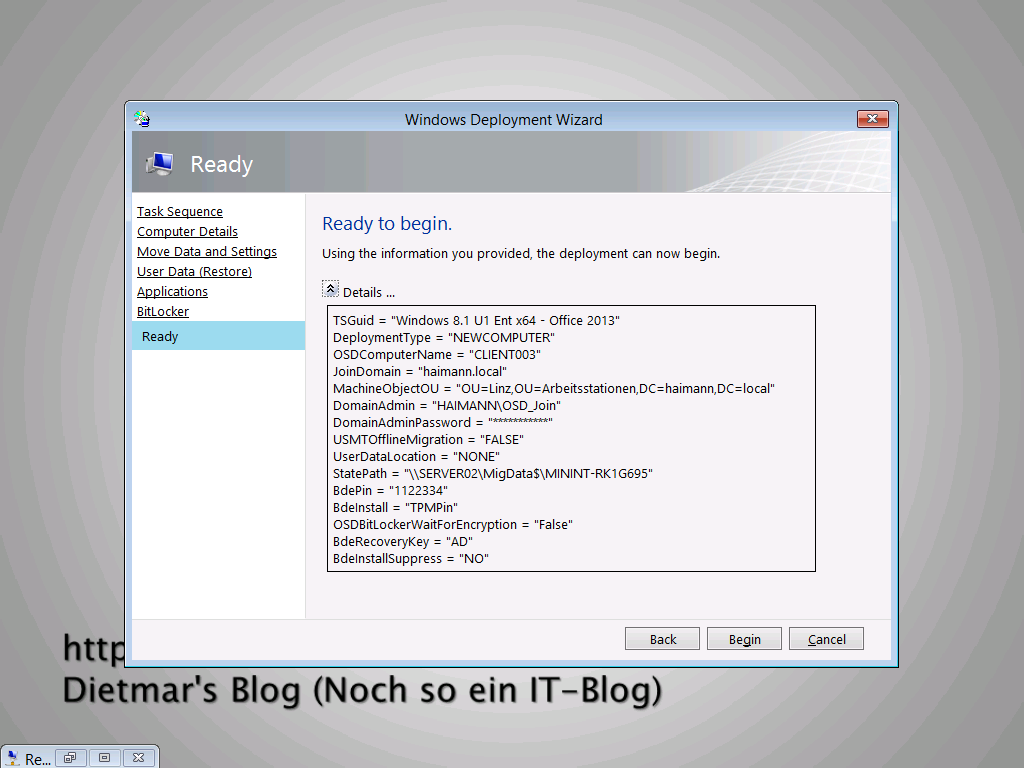
Notebook mit BitLocker aufsetzen
- Notebook einschalten und mit F12 vom Netzwerk booten
- User Credentials
- Password: Password1 > OK
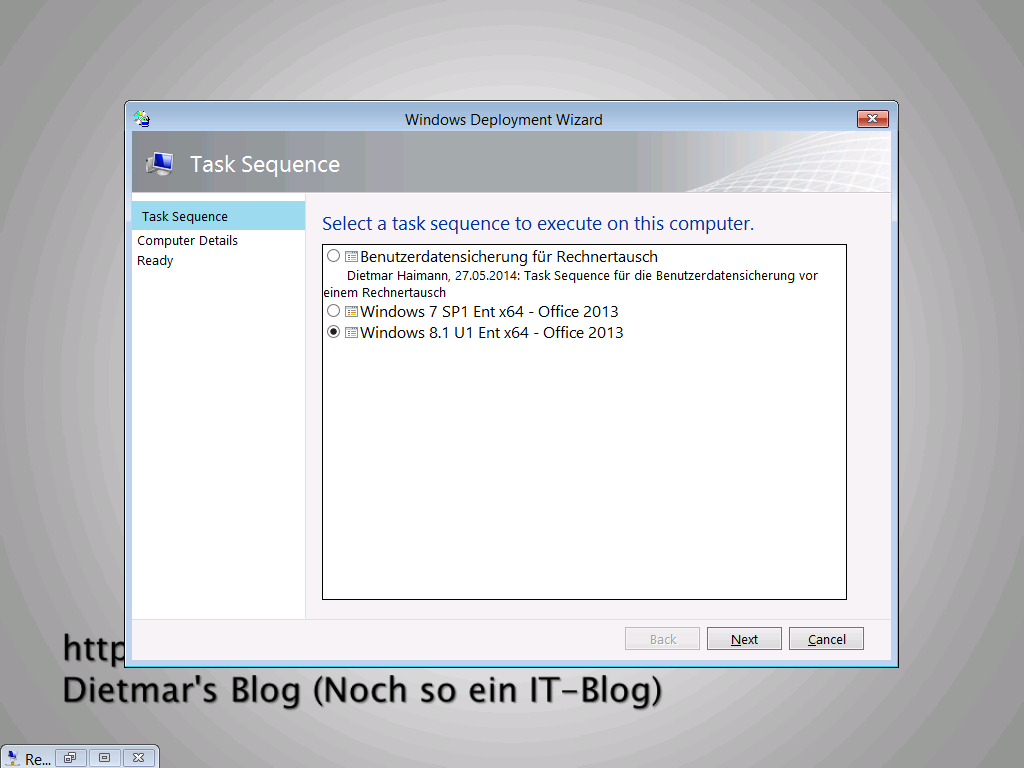
- Windows Deployment Wizard
- Task Sequence: Windows 8.1 U1 Ent x64 – Office 2013 > Next
- Computer Details
- Computer name: CLIENT003 > Next

- Computer name: CLIENT003 > Next
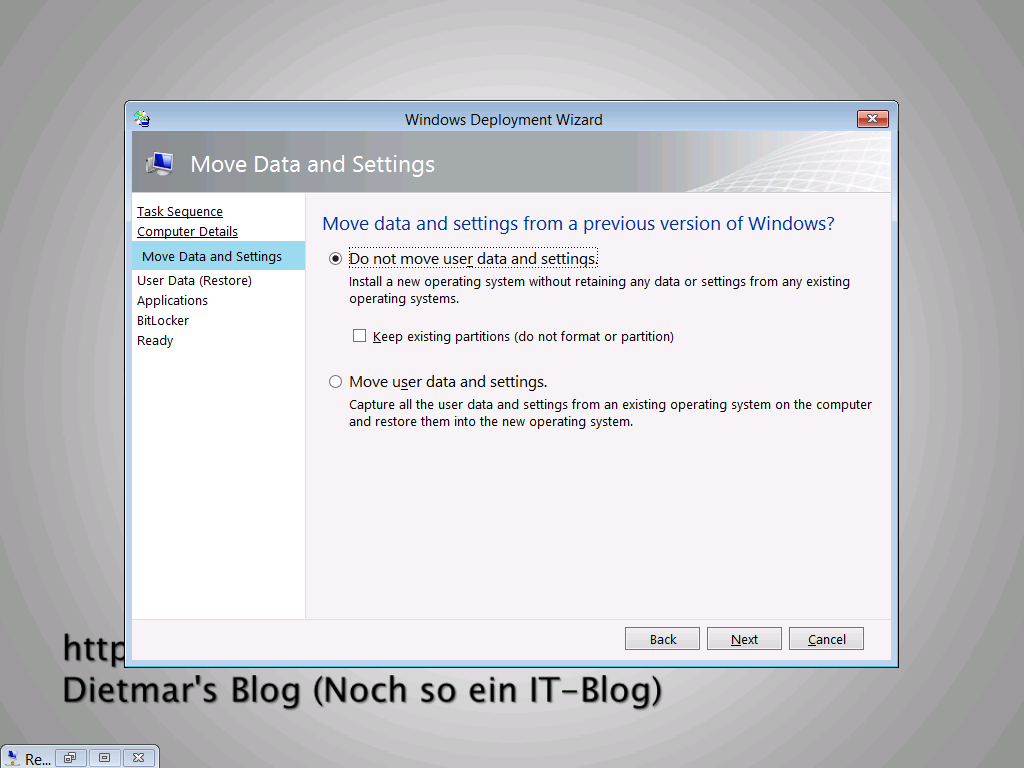
- Move Data and Settings: Do not move data and settings > Next
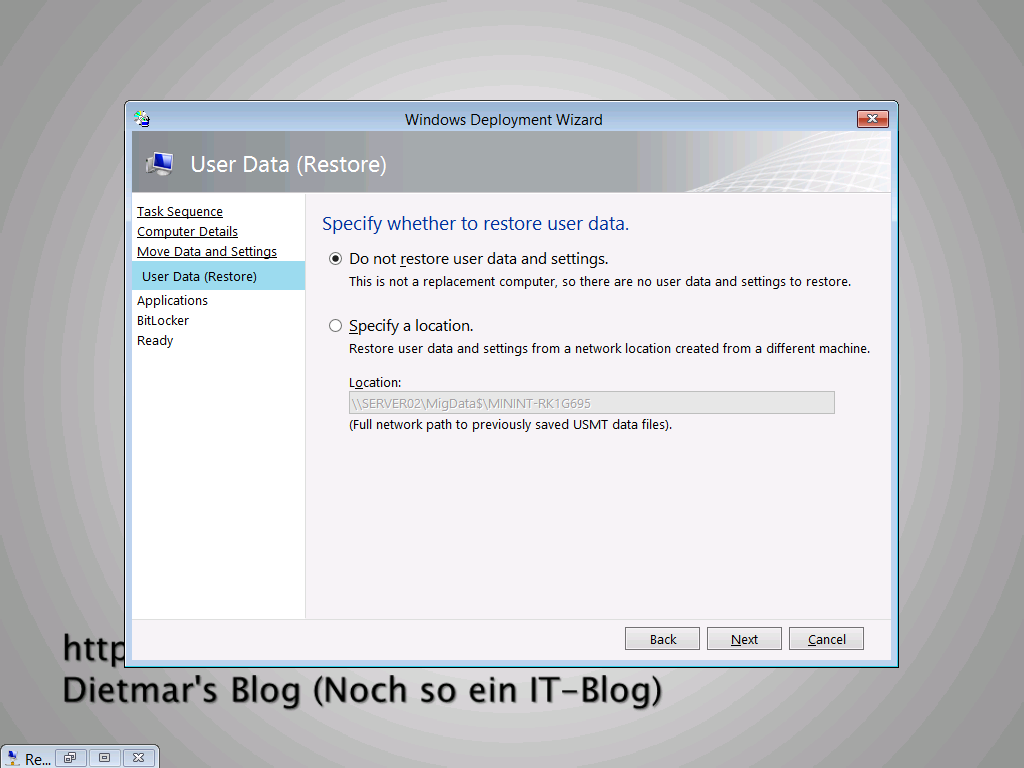
- User Data (Restore): Do not restore user data and settings > Next
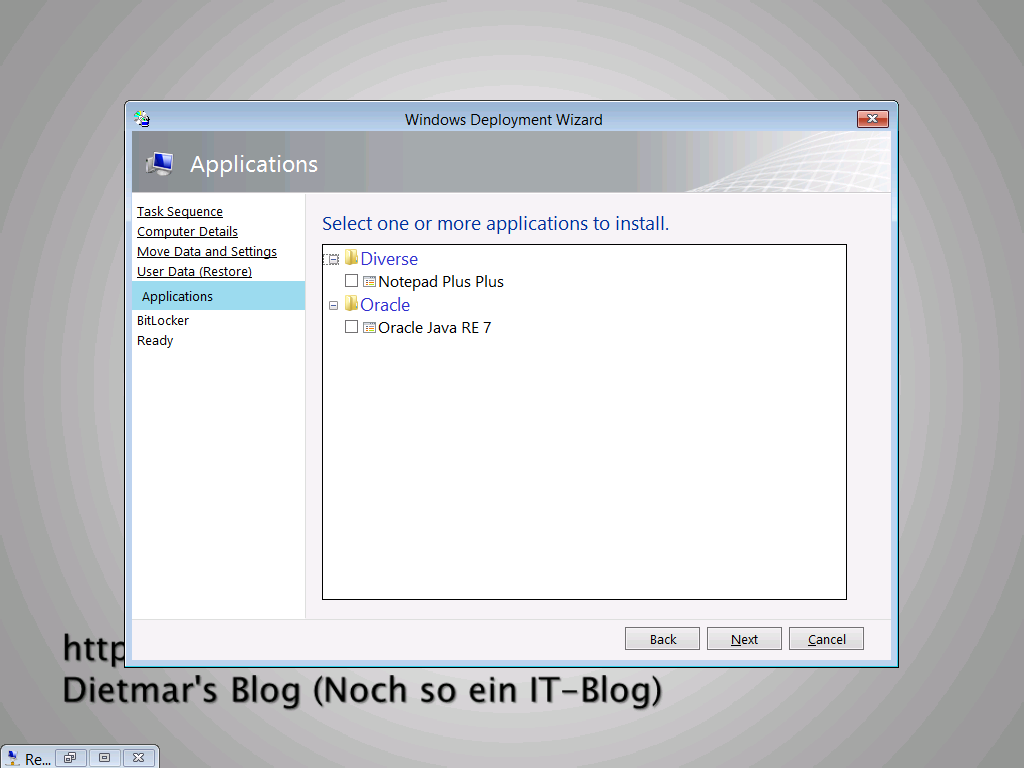
- Applications: Next
- BitLocker
- Enable BitLocker using TPM and PIN: 1122334 > Next
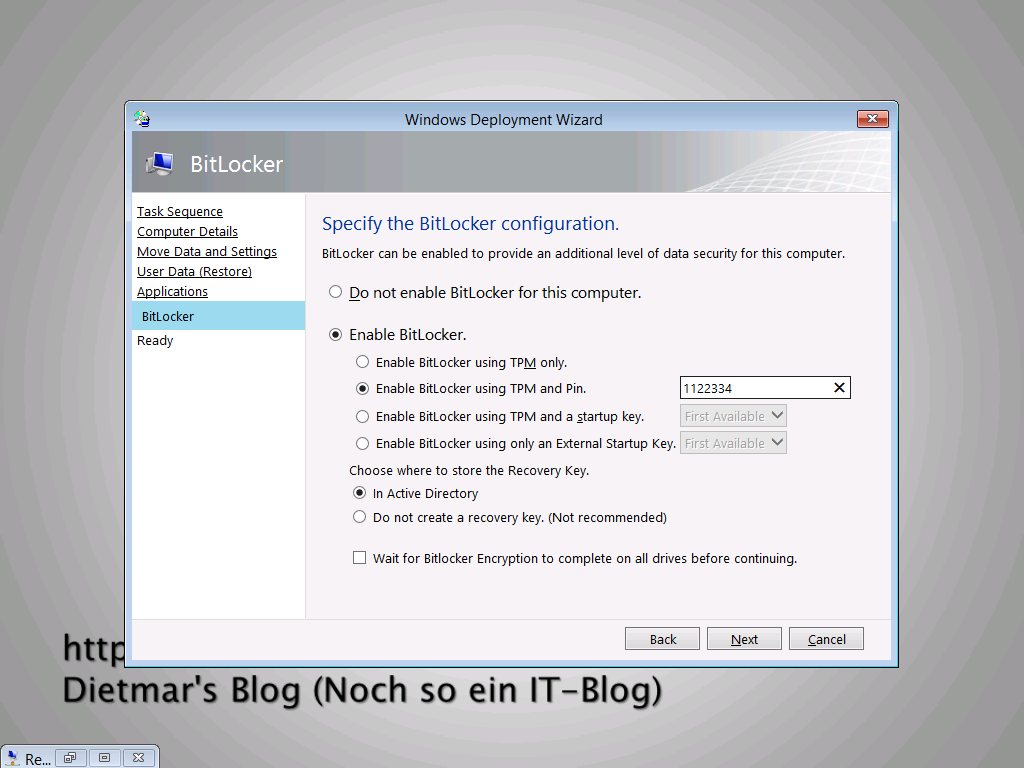
- Enable BitLocker using TPM and PIN: 1122334 > Next
- Ready: Begin
- Task Sequence: Windows 8.1 U1 Ent x64 – Office 2013 > Next
- Nach einer Weile… > Finish
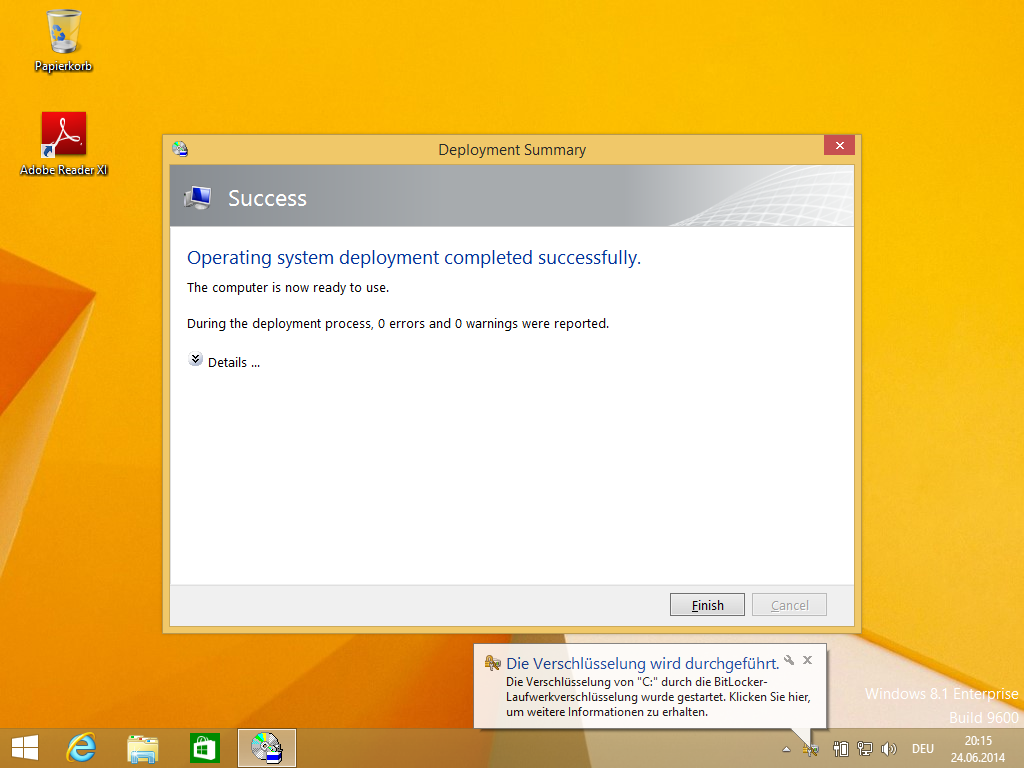
- Der Rechner wird neu gestartet
- BitLocker-PIN 1122334 eingeben
- Als Markus an Client003 anmelden
- Eingabeaufforderung (Administrator) starten
- Mit folgendem Befehl den Status der Verschlüsselung abfragen
manage-bde -status
- Abfrage-Ergebnis
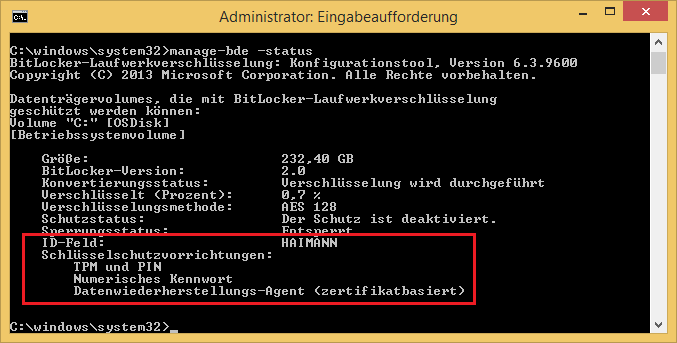
Passt! 🙂
Beim Add-TPMSelfWriteACE.vbs Skript muss die Variable SELF zu SELBST geändert werden damit es unter einer DE Betriebssystem geht.
Hallo! Welches BIOS, bzw. welche BIOS-Version hatte denn das EliteBook 8560p zum Zeitpunkt des Tests? Die F42 oder die F50? Welches Kennwort hatte denn das BIOS zu Anfang? Startet man mit einem vollkommen „jungfräulichen“ BIOS bezgl. der Security Einstellungen? Danke! Gruß, Lars
Hallo! Mein 8560p hat (immer noch) die Version F.42. Am Anfang sollte das Notebook kein Passwort haben. Für die Konfiguration der TPM-Einstellungen muss aber, zumindest temporär, ein Passwort gesetzt werden. Ich setze das BIOS vor der Erstellung der REPSET-Datei auf Werkseinstellungen zurück. Ganz jungfräulich. 🙂
Ist aber nicht so genau, weil in der REPSET-Datei nur die TPM-Einstellungen drinnen bleiben und manipuliert werden.
Hoffe das hilft!
Hallo!
Es wäre prima, wenn Du detailierter die Schritte für MDT darstellen könntest, da ich Neuling in dem Bereich bin. Oder hast DU auch die Schritte für die notwendigen SCCM TS?
Ansonsten kann ich Deine Seite(n) nur empfehlen!
VG
Guido
Hallo! Danke für’s Lesen und Weiterempfehlen!
Die Schritte zum Aktivieren des TPM-Chips sind sehr detailliert beschrieben. Die Einstellungen in der CustomSettings.ini sind zu beachten. In der Task Sequence selbst sind keine weiteren (außer der Aktivierung des TPM) Schritte notwendig.
Oder meinst generell eine ConfigMgr-Task Sequence? Welche Version setzt du ein? Was willst du alles machen? „Nur“ BitLocker oder auch MBAM? Welches OS setzt du ein, Windows 7 oder 8? Hast du MDT Task Sequences in ConfigMgr integriert? Dann kann ich schon eine Kurzmitteilung dafür schreiben.
…Dietmar
Erstmal Tolle Anleitung leider finde ich die Option „Turn on TPM backup to Active Directory Domain Services“ in den ADMX von 1803 nicht. Wurde die durch eine andere ersetzt?
Entschuldige für die späte Antwort. Ja, diese Einstellung wurde mit Windows 10 1607 entfernt und nach MBAM verschoben.
https://docs.microsoft.com/en-us/microsoft-desktop-optimization-pack/index